Popular Posts

Thursday, January 12, 2012

Goop!

While looking on Pinterest for some fun kids activities I came across a pin titled "Flubber". I immediately knew from the picture that this was the same thing as "Goop", which I remember my mom making when I was a kid. Of course, we had to do this one! 


First I gathered the ingredients:
2 bowls:

1st bowl
3 tsp of Borax
1 cup warm water

2nd bowl 
2 cups of glue
1 1/2 cups warm water
a few drops of food coloring


First mix each bowls contents well. Make sure the Borax is dissolved and the glue and water are well mixed. 


Stir the food coloring into the glue mixture.


Pour the borax mixture into the glue mixture. It will stay watery for a couple of minutes, but the chemical reaction will soon make it turn to the goop consistance.


And it's time to play! 


The kids sure love playing with the goop. I gave them each an old pizza pan to play in.


And playing...


It's been a couple of days and they are still enjoying the goop! 


Overall, this was a quick, easy, cheap and entertaining project. And it totally brought me back to my childhood. Even my hubby was having fun with it! 

I originally pinned this project from Frugal Fun Challenge

Hair bows for the girls!

As I mentioned in the last post, I've recently noticed that I haven't been creative lately. And thanks to Pinterest, I'm back to my artsy, crafty self. This is not a project I pinned on Pinterest, it's just one I decided to do on my own.

As I was weeding through my kids hair bows and getting rid of the ones that were falling apart I thought to myself, "Why haven't I ever made the kid's bows?" I mean seriously, I have a freakin' bachelor's degree in art and I buy my kids hair bows?

So, after 4 1/2 years of being a mother to girls I FINALLY made our own bows! And I thought I would share some with you.


This is just a "proud of myself" post! Hopefully, it will inspire someone else to try something they know they can do, but have just never tried.

Yarn Letters!

Lately I've found myself often thinking, "Why didn't I think of that?" Thank you Pinterest. I am realizing that I haven't used my creative mind in a while. I guess I'm always focused on the kids, hubby, house, and other grown up worries.

So, the next projects was a really simple one. And was definitely one of those DAH! moments...Wrapping cardboard letters in yarn. Why didn't I think of that?

First I picked some yarn that would match the girls' rooms. Then scrounged around the house for a piece of  card board. I wrote a big "K" on it and grabbed the exacto knife.


And started cutting. Of course, this part is for adults only. (I would never give a kid an exacto knife!)


A few minutes later... One excited child!


Then came the wrapping of the yarn and I no longer had an happy child! The wrapping was just too hard for Kennedy (4). In order for it to turn out right, the yarn needs to be tightly wrapped and it was not easy for her to keep it tight.

So, mom did the yarn.


It only took about 15 minutes and a little creativity to cover every inch of the "K". And again, I had a happy child!


We tied some yarn to the back so we could hang it on Kennedy's wall.


All in all, this was a very easy and quick project for me. But, it was not very kid friendly, at least not for a 4 and 3 year old. So, next comes the "B" for Brooke. I just have to find some more cardboard first.

I originally pinned this idea on Pinterst from Delicate Construction

Monday, January 9, 2012

Springtime Garden, in January!

So, I just pinned this craft idea today as a "cute spring craft", but in the middle of January I thought  flowers would bring a little cheer. I couldn't wait to do this one!


First, I gathered some supplies: cupcake holders, pompoms, jewels, pipe cleaners, and glue. Later I added some foam hearts and card stock to the mix for flowers. And when the flowers are finished you will need an empty egg carton and play dough. 

Please note: I used green pipe cleaners for the flower stems, but the original plan called for either green straws or popsicle sticks. The pipe cleaners were just barely strong enough to support the flowers, so I recommend using the straws or sticks.


So, the glueing began. We used the cupcake holders first. They were a little tough because the glue saturated them so much that the objects didn't want to stick to them. 


But, the girls sure loved doing this project! They loved it so much we ended with a HUGE garden! (Good thing I buy my eggs at Costco!)


Since the cupcake holders were not working so well, I started cutting shapes out of card stock. This was much easier to glue things to. 


And so the glueing continued...


I finally convinced the girls that we needed to stop making flowers and let them dry so we could "plant them in our garden" 


So, to "plant" them I used an empty egg carton and play dough. I stuck balls of play dough into each egg hole and pushed it down firmly. Then we were able to stick the flowers in. This is why something stronger than pipe cleaners would have been nice, some of them were too top heavy. 

Overall, this was a fun project. The girls absolutely loved it! And we now have a beautiful garden in the middle of January. 

I originally pinned this craft idea from Craft Scope .

Bird Feeders- Final Results


 Patients paid off! We let the rest of the bird feeders dry overnight and it worked! They look great and I'm sure the birds will love them!

Sunday, January 8, 2012

Bird Feeders, yes, this is still day one!

I must say, the kids are LOVING my mission! It was just perfect to start conquering Pinterest on a Sunday! With that being said, we started project number 2, Bird Feeders.


We first gathered the materials. You will need...
Bird seed (1 cup made 6 small bird feeders)
1 envelope of Gelatine
1/4 cup of water
Cookie cutters and/or molds ( I used some plastic sand molds)
Wax paper
and string/ribbon/wire.

We prepared by laying out the wax paper. Each child got a wax paper surface to work on. Then I tied the knots (with loops) in the string so they were ready when we needed them.


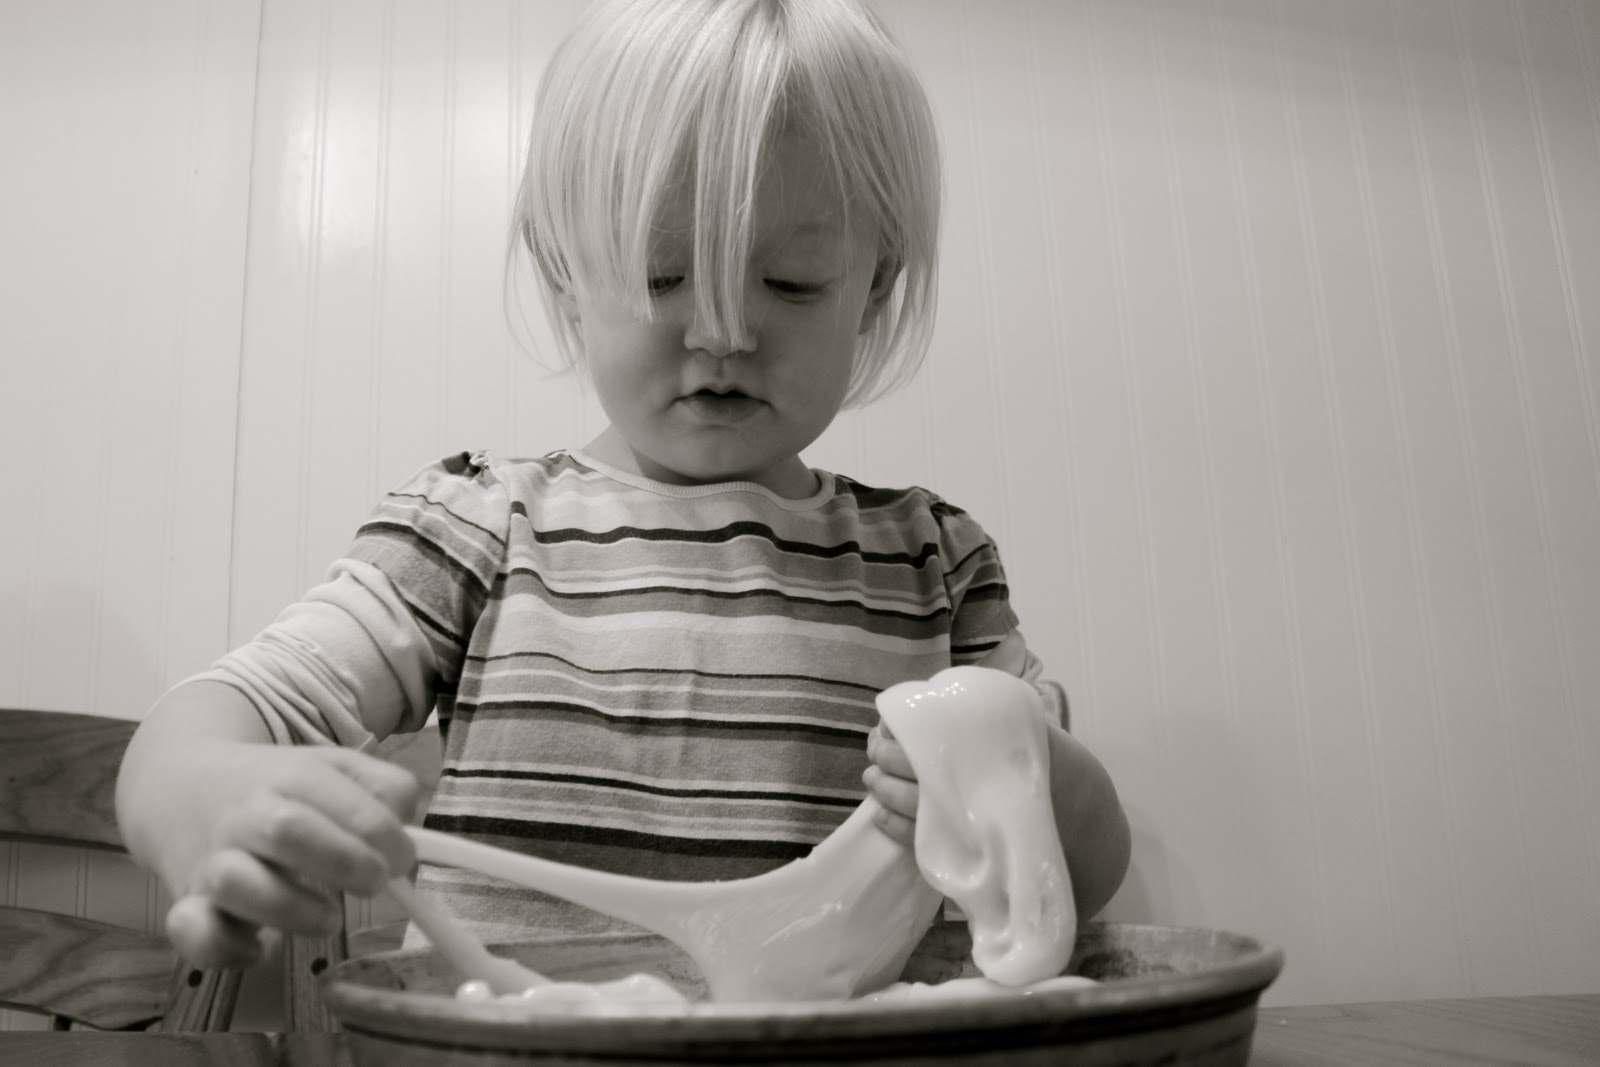
The girls waited anxiously while I did the next step, which is heating the water and Gelatine. I put the 1/4 cup of water with one envelope of Gelatine in a small pot on the stove. I heated to a simmer, stirring constantly, until the Gelatine was dissolved. This only took a couple of minutes.

Remove the pot from the heat and stir in the bird seed. (The original recipe called for 3/4 cup of bird seed and said to add more if there was extra Gelatine. Well, I had to add more seed about 4 times, so I am saying I probably used about 1 cup)


I carried the pot to the table and started spooning the seeds into the first mold. Surprisingly, the seeds were not hot and the kids were able to press them firmly into the molds and cookie cutters.

So, we filled the molds about 1/2 way and then laid the knotted loops on the seeds. (This was not as easy as it sounds. The strings WILL stick to your fingers. The gelatine mixture is REALLY sticky!) The girls had to hold the strings in place while I spooned more seeds on top. We used the wax paper to press firmly on the seeds in order to pack them down.


Kennedy and Brooke were not so happy about the stickiness. It made it really hard to work with the seeds and so I ended up doing most of the work.


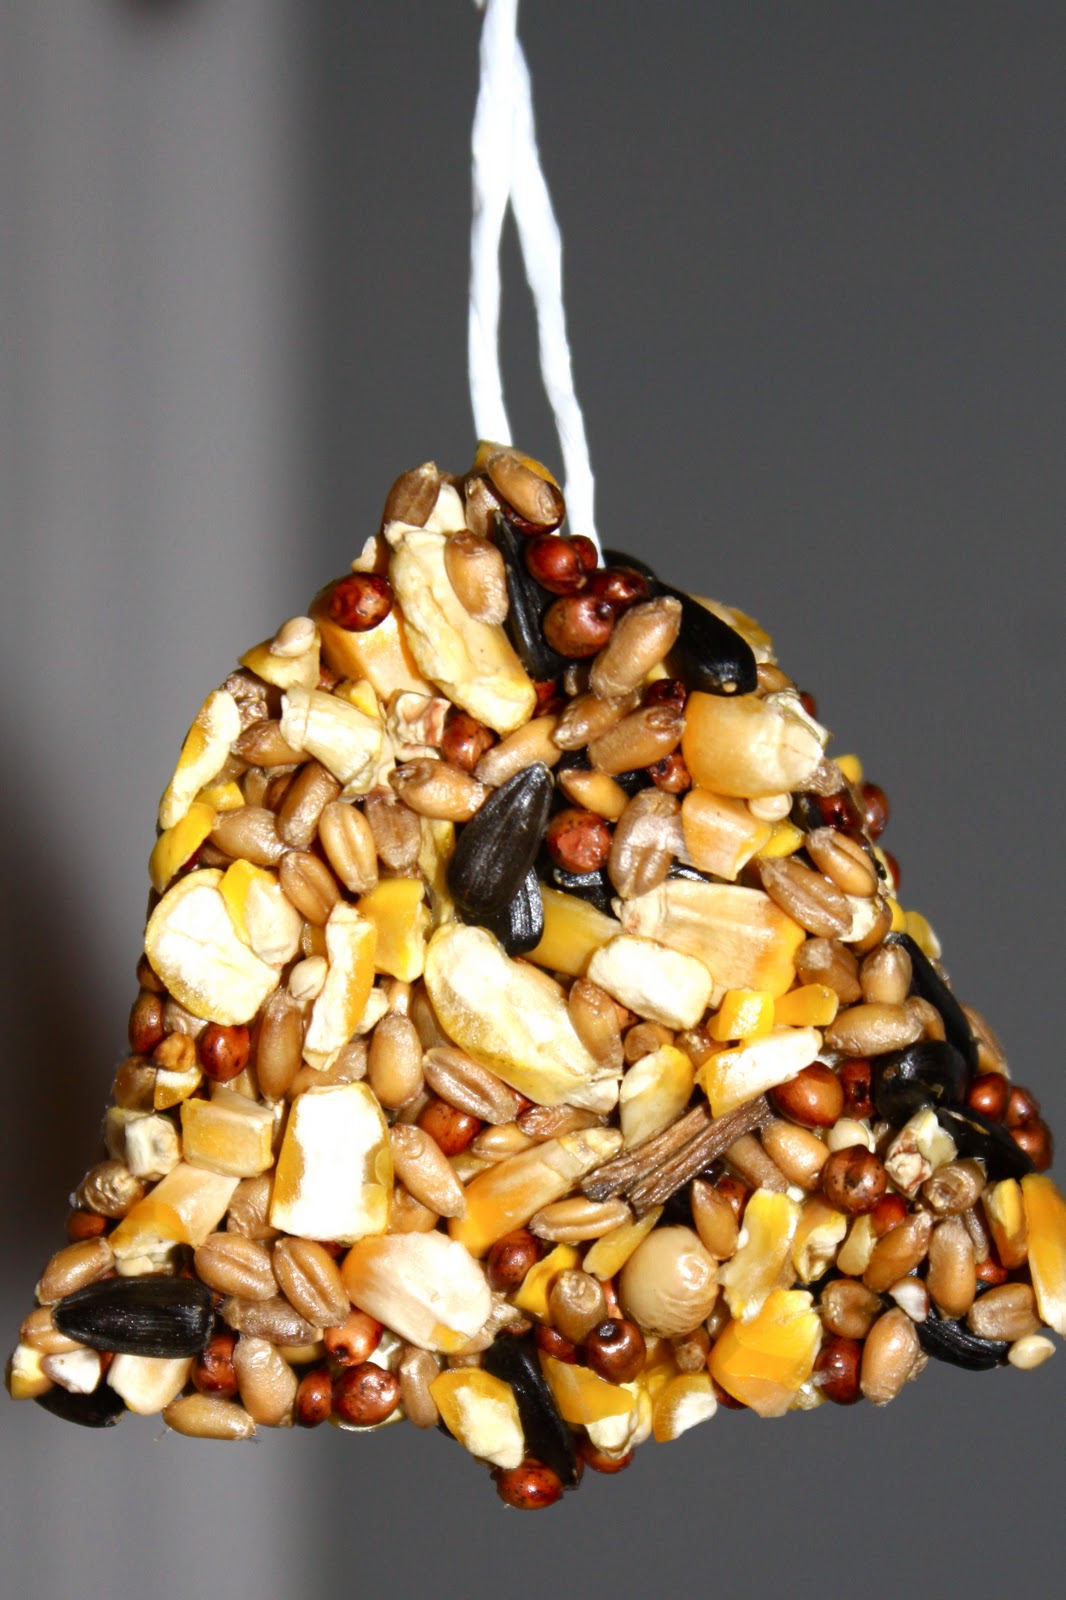
So, the instructions say to let them dry overnight. Well, we did ours in the morning and let them dry until about dinner time (Probably 6 hours) and they were not so easy to remove from the cookie cutters. I actually haven't attempted to remove them from the molds yet.


The bell bird feeder made it...


The star did not.

So, maybe I need to let them dry longer. I will wait until tomorrow to try the rest of the molds and will keep you posted on my success.

All in all, the photos on Pinterest were beautiful and I thought it would be a little less messy. The kids loved the idea of this project, but complained the entire time about the stickiness. And I have kids who love to get messy!

I originally pinned this idea from eighteen25

Still Day One- Rainbow Rice

As I mentioned earlier at 11pm I was dying rice to make rainbow rice. It was actually really easy and quick. I of course did not have the "rainbow" colors that were shown in the photo on Pinterest, so I used what I had.

What you will need:
Uncooked white rice (I used 1 cup for each color).
Food coloring (1/2 tsp per cup of rice)
Rubbing alcohol (1 tsp per cup of rice)
Plastic baggies
and a place to dry the rice (I laid wax paper on cookie sheets)

The task was very simple. I put 1 cup of rice in a Ziploc bag, poured in the food coloring and alcohol, sealed the bag, mixed it up and then poured it on the wax paper to dry.


The rice dries pretty quick, which is good if you have kids as impatient as mine. So, the next morning (remember I was dying this rice at 11pm) I poured it all into a plastic container. It wasn't all that easy to keep the colors separated like the photo on Pinterest shows, but I soon found out that there was no point in keeping the colors separate.


When my kids saw the rice you would have sworn it was Christmas morning. They couldn't stop asking questions about it and begging to play with it! So, with the early morning frost I waddled, with my pregnant belly, out to the sandbox and dug out some toys. I of course had to wash them.


And finally they got to play! I have to admit, I was surprised at how much Kennedy (4) loved it. I thought she may be too old to really enjoy it and thought that Brooke (3) would love it. But they both LOVE playing in it!


And remember how I said there was no point in keeping the colors separate? This is the rice after playtime...


All in all, I rate this as a fun, easy and quick project. And the with kids loving it as much as they do, it was well worth it! There is only one "bad" thing about the rainbow rice, which was not mentioned in the original description...


The dye DID wash off with soap and water!

I originally pinned the rainbow rice idea from Share and Remember

Day One- The beginning

Today is a great day, a fun day! Today I decided to "conquer" Pinterest. I have been a member of Pinterest.com for at least a month now and LOVE it! But, I noticed something; I have been saving all these wonderful ideas: craft projects for me, for the kids, DIY for the home, hair styles, ect, yet I had not tried any of them. So, as I was pinning more ideas onto my boards last night I decided, "I'm going to do one of these this weekend!" What a brilliant idea! I'm actually going to do one of these "amazing" ideas!

And so it began. At 11:00 last night while my kids were sound asleep in their beds I started making rainbow rice, I will tell you about that a little later. Eventually, I went to bed and as I lay there trying to fall asleep I came up with another idea...I'm going to try everything I pin on Pinterest AND I'm going to tell people about it. I'm going to share the experiences of all these "great ideas". And so began "Conquering Pinterest".

My hopes are that you will find this useful and inspiring. Inspiring as in you will actually do the things you pin on your boards and useful as in you can see the reality in some of the projects.